
The SEO & AI Search Iceberg: Why 90% of Search Growth Happens Beneath the Surface
.webp&w=3840&q=100)


Have you ever stared at a blank screen, trying to design a website or app interface, and felt completely stuck? You are not alone. Design can be hard, especially if you are a developer who cares more about code than colors, or a beginner who has big ideas but zero design experience.
That is where AI changes everything.
Anthropic recently released something exciting called Claude Design which is a new feature inside Claude that lets you create real, working designs just by having a conversation. No complicated design software. No expensive courses. Just you, your ideas, and Claude.
So, how to use claude code frontend design plugin? While the tool is officially called Claude Design, many people in the community refer to it as a plugin because it feels like adding a superpower to your workflow. And honestly? That is exactly what it is.
With this tool, you can build dashboards, landing pages, mobile app screens, presentations, and interactive prototypes, all by typing what you want. Claude generates the design right in front of your eyes, and you can keep tweaking until it is perfect.
In this guide, I will walk you through everything you need to know. Whether you are a product manager, a developer, a freelancer, or just someone curious about Claude AI design, you will leave here ready to build your first project.
Let us dive in.
Before we get our hands dirty, let us clarify what this tool actually is.
It is actually a research preview from Anthropic Labs called Claude Design. It lives inside Claude.ai and is available to Pro, Max, Team, and Enterprise users. Think of it as an AI design assistant that never sleeps, never complains, and gets better with every request you make.
So why do people call it a plugin? Because it integrates so smoothly into your workflow that it feels like an add-on. You do not switch tools. You do not export and import constantly. You just chat, and Claude builds.
The main difference between this and other design tools is simple: no drag and drop. You do not move boxes around with your mouse. You describe what you want, and Claude creates it instantly.
It automatically inherits your brand colors, fonts, and components if your organization has set up a design system.
You can upload screenshots, codebases, or existing designs as references.
The output is production-ready, meaning developers can actually use what you create.
Building internal tools for your operations team
Designing client landing pages in minutes
Prototyping app screens before writing a single line of code
Creating presentations and slide decks
Generating UX research summaries and accessibility audits
This is not a replacement for professional tools like Figma or Sketch. But for speed, experimentation, and getting unstuck? Nothing comes close to claude code design.
Now let us talk about what this tool can actually do for your UI and UX work. Claude AI design is packed with features that save hours of manual work.
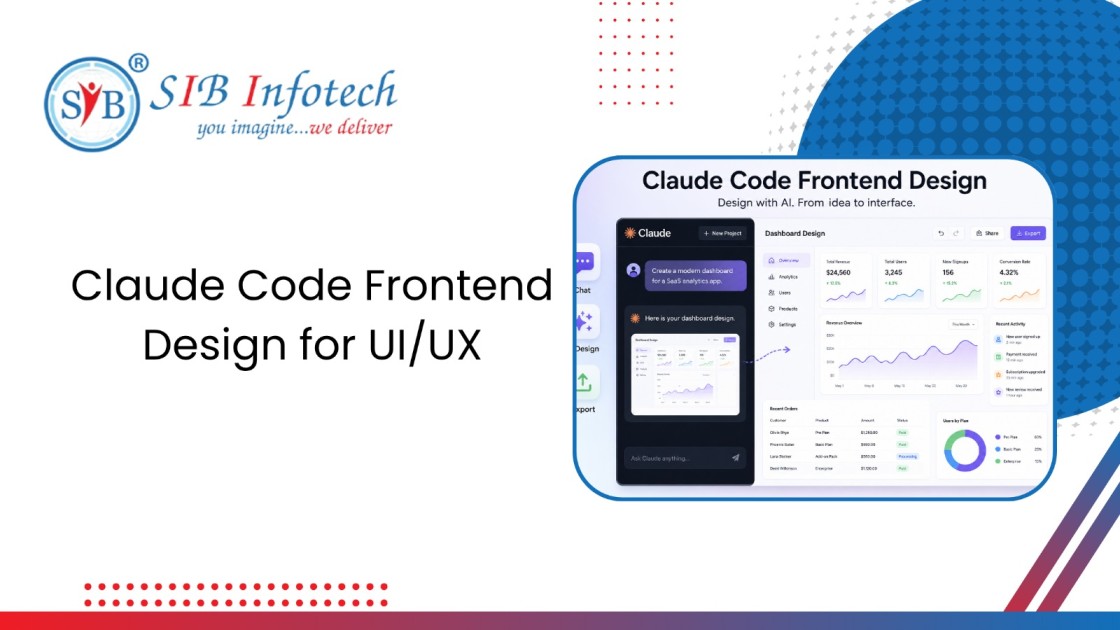
You describe the structure, for example, "a dashboard with a revenue chart on top, recent orders in the middle, and customer feedback on the right," and Claude builds it. The layout is clean, responsive, and functional from the first generation.
Stuck on button labels or error messages? Claude suggests copy that fits your brand voice. You can ask for shorter text, a more professional tone, or even emoji-friendly versions.
Here is a feature most tools ignore. Claude can review your design for contrast ratios, font sizes, keyboard navigation, and screen reader compatibility. You just ask, "Check this design for accessibility issues." Claude will point out problems and fix them.
If you have user interview notes or survey data, upload them. Claude can identify patterns, suggest design changes based on feedback, and even create user personas from raw text.
This is where claude code UX design shines. If your team has a design system (colors, typography, button styles), Claude uses it automatically. You never have to say "make this blue" repeatedly. It just knows.
All of these features work together to make you a faster, smarter designer – even if you have zero formal training.
Now we get to the heart of this guide. You are here to learn how to use the Claude Code design, and I am going to show you exactly how, step by step.
First, log into Claude.ai with your Pro, Max, Team, or Enterprise account. If you are on an Enterprise plan, your admin may need to turn on Claude Design, it is off by default for security reasons.
Once inside, look for the Claude Design option. Click New Project.
Your project will automatically inherit your organization's design system. That means your brand colors, fonts, and component patterns are already set up. You do not need to upload anything yet.
Give your project a name. Something simple like "Landing Page V1" or "Dashboard Test" works fine.
Here is the secret to getting good results: context is everything.
You can attach reference material at any time. Claude accepts:
For example, if you want Claude to "make it look like this famous app," just upload a screenshot and say exactly that. Claude will study the image and replicate the style.
You do not need to be a design expert. You just need to be clear.
A strong prompt includes four things:
Claude will ask clarifying questions if something is missing. Do not worry about getting it perfect the first time. The first generation is just a starting point.
Once you send your prompt, Claude gets to work. On the left side, you see the chat. On the right side, you see a canvas and that canvas fills with your design in real time.
Look at what Claude created. Does the layout match what you imagined? Are the colors right? Is the information easy to understand?
Do not expect perfection yet. Expect a solid first draft.
This is where the magic happens. You can improve your design in two ways.
Using chat is best for big changes:
Using inline comments is best for small, specific fixes:
Click directly on any part of the canvas and type a comment. For example:
A quick tip: sometimes inline comments disappear before Claude reads them. If that happens, just paste your comment into the chat instead. That always works.
Keep iterating until the design feels right. Most people go through 5 to 10 rounds of feedback before exporting.
When you are happy with the result, click the Export button in the upper right corner.
You can choose from:
You can also share a link with teammates. Set permissions to view-only, comment, or edit depending on their role.
That is it. Six steps from blank screen to export-ready design.
Let me share some real-world examples of Claude web design and Claude Code UX design in action.
Imagine you are building a portfolio site for a photographer. You tell Claude: "Create a minimalist portfolio with a full-width hero image, a grid gallery below, and a contact form at the bottom. Use light gray background and white cards."
Thirty seconds later, you have a working design. You tweak the spacing, adjust the font sizes with inline comments, and export HTML. What used to take three hours now takes fifteen minutes.
You just finished user interviews for a food delivery app. You upload your interview transcripts to Claude and ask, "Synthesize this feedback into top three pain points and suggest design improvements."
Claude reads everything, identifies that users struggle with checkout, and generates a redesigned checkout flow with fewer steps, clearer buttons, and progress indicators. You take that design into your next stakeholder meeting and get approval immediately.
You hate designing. You just want to code. But clients expect mockups. With Claude web design, you generate the UI yourself, export HTML and CSS, and then add your backend logic. No more waiting for designers. No more expensive freelance bills.
You need to test an idea quickly. Instead of asking your design team to spend two days on high-fidelity mockups, you open Claude, describe the feature, and have a clickable prototype in an hour. You show it to users, collect feedback, and iterate before writing a single line of production code.
Why should you bother learning this tool? Here are the biggest benefits I have seen.
What takes hours in traditional tools takes minutes with Claude. You skip the setup, the searching for components, the aligning and the exporting. You just talk.
Claude handles repetitive tasks like creating consistent spacing, applying brand colors, and generating responsive layouts. You focus on the big picture.
Share links instead of files. Teammates can comment without creating accounts or installing software. Non-designers finally have a voice in the design process.
You do not need to know design principles. You do not need to understand typography or color theory. Claude handles the technical stuff while you provide the vision.
One Claude subscription replaces multiple design tools, stock photo subscriptions, and potentially even freelance hours. For startups and solopreneurs, this is a game-changer.
Cost-Effective: One Claude subscription replaces multiple design tools, stock photo subscriptions, and potentially even freelance hours. For startups and solopreneurs, this is a game-changer
Claude Design is amazing, but it is not perfect. Here is what you should know before relying on it completely.
It is still experimental. This is a research preview from Anthropic Labs. That means bugs, unexpected behavior, and occasional frustration. Inline comments sometimes disappear. Save errors can happen in compact view. Large codebases may cause lag.
Not a full design replacement. For complex, production-grade design systems with hundreds of components and intricate interactions, you still need tools like Figma or professional designers. Claude is best for speed, not depth.
Claude Design requires clear prompts. If you say "make a nice website," Claude will guess and you probably will not like the result. The more specific you are, the better your output.
Limited offline access. This is a cloud tool. Without internet, you cannot work. Keep that in mind if you travel frequently or have unreliable connections.
Enterprise plans need admin approval. If your company uses Claude Enterprise, someone has to turn on Claude Design. It is not automatic.
Understanding these limitations helps you use the tool wisely, not as a magic wand, but as a powerful assistant.
Claude gives you the design. SIB Infotech gives you an advanced website.
With 18+ years of expertise, SIB Infotech transforms your Claude-generated designs into high-performance, production-ready websites that load fast, rank on Google, and convert visitors into customers. Their Search Experience Optimization approach ensures every design element works for both users and search engines.
From pixel-perfect development to enterprise-grade security and advanced integrations like payment gateways and custom dashboards, SIB Infotech bridges the gap between AI-generated concepts and real-world business results.
Contact SIB Infotech now to bring your Claude design to life.
By now, you have a clear roadmap. You know how to use the Claude Code frontend design plugin from start to finish. You understand the features, the workflow, the benefits, and the limitations.
Here is what I want you to do next.
Stop reading. Open Claude Design. Create your first project. Start with something small like a single landing page or a simple dashboard. Go through all six steps. Make mistakes. Iterate. Export something.
You do not need to be a designer. You do not need to write a single line of code. You just need to start a conversation.
Ready to try how to use Claude design for yourself? Log into Claude.ai today, look for Claude Design, and build something you are proud of. Your next great design is just a chat away.